Windows 10 is nearing its end. On October 14, 2025, Microsoft will stop providing security updates, leaving millions of PCs vulnerable to cyberattacks. But there’s no need to panic! There are solutions to extend the life of your machine and upgrade to Windows 11 without losing your data, even if your computer is deemed incompatible.
After more than a decade of reliable service, Windows 10 is saying goodbye. To ensure security and enjoy the latest features, upgrading to Windows 11 is essential. The good news is that you don’t need to throw away your PC or break the bank. With a simple utility and a few specific steps, you can force the installation of Windows 11 and experience a modern OS, even on a machine that doesn’t meet Microsoft’s official requirements. In this article, we’ll guide you step by step.
The End of Windows 10 in 2025
The countdown has begun. Microsoft will officially retire Windows 10. There will be no more security updates, no patches for vulnerabilities. The system will become an inviting target for cybercriminals.
😨 Microsoft is ending Windows 10 support on October 14, 2025.
Upgrade to Windows 11 for essential security updates, or your PC will be at risk. Don’t wait! 💻🛡️#Windows10EOL #TechNews #UpgradeNow pic.twitter.com/Hbp9sfpZKW— Times Of Cinema (@Times_of_Cinema) September 27, 2025
So, what should you do? Upgrade to Windows 11 of course! Even if your PC is not officially compatible, there are very simple methods to force the update without losing your files or apps.
You can also opt for the Extended Security Updates (ESU) program. You’ll need to pay for one more year of security fixes until October 13, 2026. This service will be available in France starting October 2025. However, know that this is just a temporary solution.
Several options are available. If your PC is compatible, Microsoft will offer you the free upgrade to Windows 11 automatically. Otherwise, you have two official choices: either purchase a new PC (which is what Microsoft hopes) or switch to another system like Linux Mint or ChromeOS Flex.
But if you prefer to stick with Windows and your favorite apps, there is a third option. You can force the installation of Windows 11 on your machine. Microsoft has set quite strict criteria for Windows 11 (recent processor, TPM 2.0, Secure Boot, etc.).
However, most PCs running Windows 10 can run Windows 11 quite well. The issue is that Microsoft blocks the installation by default. Fortunately, tools exist to circumvent these restrictions with just a few clicks.
Steps to Follow to Install Windows 11 on Your PC

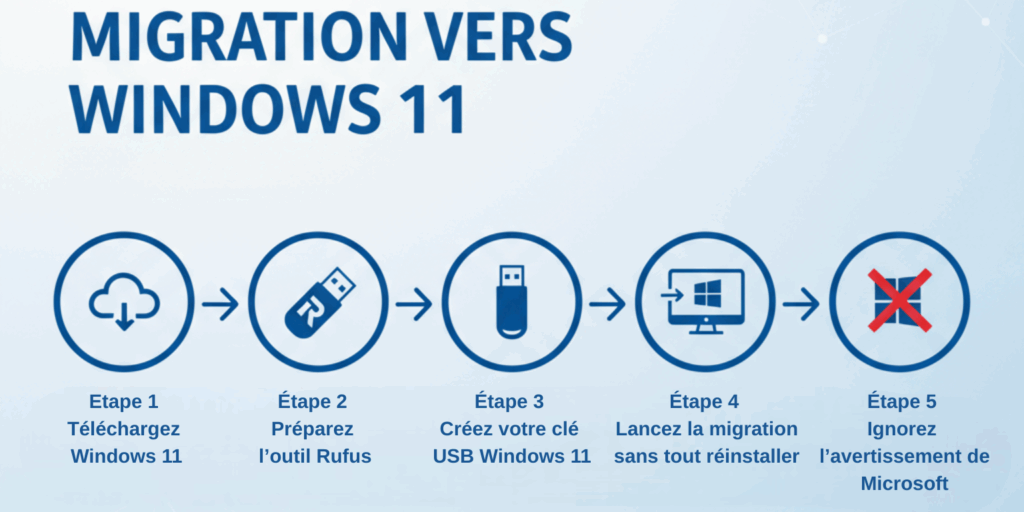
First, go to the Microsoft website to download the Windows 11 ISO. The ISO is a complete image of the operating system, a large file that will serve as the basis for creating your installation USB drive.
Next, visit the official Rufus website and download it. This tool will help you create bootable USB drives, and it offers special options for installing Windows 11 on PCs considered incompatible.
Then, insert a USB drive (minimum 8GB), open Rufus, select your USB drive, and choose the Windows 11 ISO you downloaded earlier. Click on Start and confirm the options provided (these disable compatibility checks). A few minutes later, your USB drive will be ready.
You won’t need to restart your PC and boot from the USB drive as you would with a standard installation. Here, simply open the File Explorer, go to your USB drive, and launch the Setup.exe file. The Windows 11 installation assistant will start; click Next, then Accept, and you’re set. Your files and apps will remain intact, only the version of Windows will change.
At one point, you’ll see a message saying, “The installation of Windows 11 on this PC is not recommended.” This is Microsoft distancing itself in case something goes wrong. However, in practice, most users (including those on non-compatible PCs) still receive updates normally. Click Accept and let the magic happen.
Your PC will restart several times, but ultimately, you will find your files, applications, and sessions just as before—except now you’ll be running Windows 11, automatically activated with your Windows 10 license.


